Trees That Stink

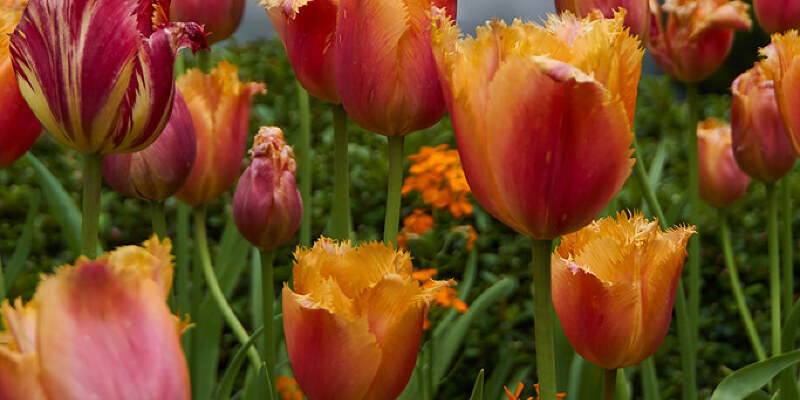
Trees should add beauty to the garden, but trees shouldn’t be selected based on appearances alone. Trees like Bradford pears (Pyrus calleryana “Bradford”), maidenhair tree, tree of heaven and Chinese chestnut provide beautiful foliage or blooms, but the offensive scents emitted by their flowers or fruit can be a nuisance. These trees work best on large properties where they are enjoyed from a space but must be avoided if you have close neighbors.

Bradford Pears

Bradford pear is a cultivar of the callery pear and is increased in U.S. Department of Agriculture plant hardiness zones 5 through 9. Trees develop a pyramidal shape up to 50 feet tall and 35 feet wide, with a brilliant display of white flowers in early spring and leaves of crimson, yellow and orange in autumn. Unfortunately, despite their visual appearance, the flowers are famous for filling the air with a scent likened to rotting fish, one of other descriptors. The scent fades with the blooms, but because Bradford pears commonly line city roads, the collective scent might be too much to handle. Other flowering fruit alternatives for USDA zones 8 through 10 include flowering crabapple (Malus spp.) and Taiwan flowering cherry (Prunus campanulata).

Maidenhair Trees

Maidenhair trees (Ginkgo biloba), grown in USDA zones 4 through 9, are one of the oldest known tree species, having existed in its present form for more than 230 thousand decades. The maidenhair name comes in the thin veins on the fan-shaped leaves. These 50- to 80-foot trees display bright yellow foliage in autumn to fill the garden with shade. Female trees begin producing fruit after approximately 20 decades. The fruit creates a slimy mess when it falls into the bottom, and also the contaminated fruit odor is often compared to rotten eggs and vomit. This should not turn you off of Gingko trees completely because male tree do not produce fruit. Select nursery-grown cultivars like “Fastigiata,” “Autumn Gold,” “Lakeview” and “Sentry,” which are made of cuttings of plants that are male to guarantee the sex.

Tree of Heaven

Grown in USDA zones 2 through 11, tree of heaven is one of the easiest trees to grow since it tolerates extreme cold and heat and adapts to a broad selection of soils. Though its common name would indicate tree of heaven (Ailanthus altissima) lacks some imperfections, the informal nickname, stink tree, perhaps better characterizes this particular tree. Both female and male trees develop yellow-green flowers. Male trees produce approximately four times as many blooms as feminine trees, but the male flowers smell awfully foul and attract insects. To prevent this issue, pick nursery trees grown from root cuttings of a female tree. Seeds self-sow readily, which makes the tree potentially dangerous. Although several trees might grow from decreased seed around your ailanthus, you cannot predict the sex and ought to eliminate atom as they develop.

Military Coat

Chinese chestnut trees (Castanea mollissima) boom in USDA zones 4 through 8 in which they are grown for their medium-sized, edible nuts. Trees adapt to the majority of well-drained ground types and grow 40 to 60 feet tall. Besides the spiny nuts, Chinese chestnut contains big, glossy leaves with serrated edges with sharp teeth. Its yellow or white flowers bloom in early summer, filling the air with a strong odor that would be off-putting if planted too near a home. Male and female trees produce flowers, but just the male flowers stink. Should you grow Chinese chestnut just as an ornamental, you can choose a female tree, but equally a female and male tree is required for permeable nut creation.

See related

Very good Flowers to Plant in Part Sun

Plants that require a full-sun exposure, at least six to eight hours of sunlight every day, may survive in part sun but will bloom less or not at all. To get a fantastic floral display in part sun or partial shade regions that get just four or five hours of direct sunlight, choose plants that thrive naturally in these conditions. In addition to sun exposure, the plant’s soil and moisture requirements should be considered when selecting flowering plants to your garden or landscape.

Spring to Fall Flowers

Jerusalem sage (Phlomis fruticosa) is a great plant for yellow flowers in which the land is sandy and nutrient-poor. It’s highly tolerant of drought, deer and salty conditions. The plants grow to a height of 2 to 4 ft using gray-green foliage. They are hardy in U.S. Department of Agriculture plant hardiness zones 7 to 10 and remain evergreen in the winter in USDA zones 8 to 10. Part sun is ideal for them in hot Mediterranean neighborhoods. Moss verbena (Glandularia puchella) is fantastic for pink, purple or white flowers in sites where the soil is average but drains well. The plants grow to a height of 1 foot using delicate-looking, gray-green to light-green foliage. Their little flowers are made in 3-inch-diameter clusters from early spring through fall. This drought-tolerant perennial is evergreen in USDA zones 9B to 11. At USDA zones 7B to 9A, the stems are killed by frost but grow back as soon as the weather warms.

Cool-season Flowers

Pansies (Viola x Wittrockiana) are great for cool-season blossoms in warm Mediterranean neighborhoods. The plants grow to a height of 4 to 10 inches and can be found in an assortment of flower colors from blue, purple, red or white to apricot or brown and red bicolors. They are hardy in USDA zones 7 to 10 and grow in any soil type, though organic matter should be added to extremely sandy soil. Lenten rose plants (Helleborus orientalis) are great for green, pink, purple white and red winter blooms in USDA zones 4 to 9. The plants grow to a height of 16 to 20 inches and create 2- to 3-inch-diameter flowers. They prefer soil that is high in organic matter. Pansies and Lenten roses are both deer-tolerant.

Spring Flowers

Daffodils (Narcissus spp.) Are great for spring blooms in sandy or sandy-loam soils in part sun. They’ve deep-green, strap-type leaves and range in height from 4 inches to 2 feet. The blossoms are most commonly yellow but may also be white with pink, pink or red centers. They are hardy in USDA zones 4 to 8 or 9, depending on the species. Moss phlox (Phlox subulata) are great for pink, purple, red or white spring blooms in part sun sites with soil that is high in organic matter. The plants are 3 to 6 inches tall and create an abundance of 3/4-inch-diameter blooms. They are drought- and air pollution-tolerant, hardy in USDA zones 3 to 9 and so are seldom bothered by deer browsing.

Year-round Flowers

Pincushion blossoms (Scabiosa columbaria) and Knock Out roses (Rosa Radrazz) are great plants for almost year-round flowery interest in Mediterranean climates. Pincushion flowers, also known as butterfly blue or small scabious, create 1-1/2-inch-diameter blooms in blue, pink, white or purple. The plants grow to 1 to 2 feet tall using gray-green foliage. They are hardy in USDA zones 4 to 10, deer- and drought-tolerant and grow in part sun with average garden soil. Knock Out roses produce 3- to 5-inch-diameter blossoms which can be single- or even double-form and multicolored, pink, red or yellow. The shrubs grow to a height of 3 to 4 ft using burgundy-green foliage. This shrub rose hybrid thrives in part sun with as little as three hours of sunlight every day. They are immune to the usual rose diseases, drought- and air pollution-tolerant and hardy in USDA zones 4 to 9.

See related

When to Use Lime & Grub Kill After Grass Seeds Are Planted?

Your lawn is a mini ecosystem that depends on fertile land and pest-free surroundings for a long and healthful lifestyle. Utilizing lime and grub killer on your lawn permits you to control your pest population whilst giving a balanced soil pH for strong grass roots. But applying these chemicals to your newly planted lawn may harm the growing seedlings unless you time the program correctly.

Establishing Grass

Even though it takes two growing seasons to fully establish a new lawn, the seedlings should be prepared for lime and grub killer once they reach 3 to 4 inches tall. Now, your new grass has never been cut and you should mow the lawn to remove one-third of the blades’ lengths. A nicely trimmed lawn allows you to use the chemicals evenly. When you have extremely long grass blades, the chemicals cannot spread correctly. Sticking to the grass to develop gives you a visual mark that the ground cover is established enough for you to apply chemicals.

Liming

The very best time to lime your lawn is before seeding the region — the lime can take a couple of months to totally change the soil’s pH. But recently seeded lawn areas might still receive liming as long as the grass has grown enough. Use a soil pH test kit at the summer or spring to find out whether liming is needed. To reduce weed seeds from taking advantage of the best soil pH, lime the grass close to the end of summer and into fall. Over the cooler months, the soil has a chance to modify its acidity degree so new grass growth explodes the next spring.

Slow-Release Grub Killer

If your region is prone to grub infestations, you need to apply a slow-release grub killer close to the start of June following the new grass seeds are tall enough for normal mowing. Because the grass blades have been firmly rooted, they withstand the chemical program. As an instance, the slow-release chemical remains within the grass roots and blades so grubs feeding them through August perish away. Poorly established grasses cannot tolerate this long-term compound existence.

Immediate Grub Killer

Immediate grub killer combinations typically have more powerful chemicals so that they can eradicate an unexpected infestation. Well-established grasses readily withstand the instant grub kill. The chemical typically wears off quickly so that the grass doesn’t have any lasting residues on its own blades. Immature grasses have a tendency to suffer and perish from strong chemical exposures.

See related

Do You Get as Most Tomatoes From an Upside Down Plant?

Growing tomatoes upside down has been a popular trend for many decades. The design is based on the hypothesis that the stems of this tomato plant can be allowed to hang freely rather than fighting gravity to remain erect and water can flow more easily throughout the plant. Although the trendy look of the planters is an appealing addition to a container garden and can yield a successful harvest, there are several elements that can inhibit fruit production.

Container Size

Tomato plants have an extensive root system that requires a massive container. Upside down planters are usually not very large since they become quite heavy, especially when watered. If the root growth of this plant is restricted due to container size, the remaining part of the plant development will be limited as well. This can result in decreased fruit production. The upside down planters can only accommodate a couple of plants in the most. Unless you can supplement your hanging plant using other tomato crops, you will be restricted in the amount of tomatoes you get from this single plant.

Support

Traditionally grown tomatoes need structural support to assist the plant grow erect. The upside down planter does not offer support since the stems are allowed to hang down in the planter. Over time, the stems may begin to grow upward, toward the sunlight, making a U shape. The branches can become weighed down when they begin producing fruit which can lead to broken stems and lost fruit. Choose a dwarf tomato plant or even a variety with smaller fruit size to assist with the issue of the branches getting too heavy.

Cultural Factors

When an upside down tomato plant is watered, the water lands on the leaves and might remain there throughout the day. This can result in infection and compromise that the fruit quality. The soil in containers will dry out more quickly than soil in the ground. This fact along with the large root system and water conditions of tomato crops means an upside down plant needs careful monitoring for water. Insufficient water will influence the plant’s capacity to produce fruit.

Care

Container-grown tomatoes are reliant on the gardener to get their needs to be fulfilled. It takes just a diligent gardener to supply the normal watering, pest monitoring and attention to stems that are getting too heavy with fruit. Without regular attention, your upside down tomato plant may produce less fruit.

See related

How to Plant Red Currant Tomatoes at Planter Bags

Planter totes, also known as growing totes, are polypropylene containers designed to contain a growing medium — basically a mobile, self-contained garden. The wide range of plant life you can develop in a planting bag is only restricted by the magnitude of the bag. Red currant tomatoes are known for their high sugar content and vigorous growth, and their small size make them perfect for planting bag cultivation.

Water the soil of the red currant seedlings till it drains from the pots. Place the pots in a tray and then fill to the brim of their pots. Permit the pots to soak for one hour.

Rank the vacant planter bags outdoors in a well-aerated area that receives eight hours of full sunlight every day. Pour compost and soil mix in the planter bag before three-fourth full.

Break up the compost with a garden fork till aerated and loose. Mix 1 gallon of water with 3 tablespoons of 8-8-8 fertilizer or comparable balanced fertilizer to make a fertilizer starter solution.

Pour the flux starter solution over the soil until it reaches 2 inches deeper than the seedlings were planted in the pots. Insert a wood skewer in the dirt after binder and eliminate it to measure how deep the fertilizer penetrated.

Dig a depression in the soil 2 inches deeper than the seedlings were planted in the pots with a garden trowel.

Put the seedling in the depression. Backfill and cover the red currant seedling with the soil you removed. If you’ve got a long planter bags, you can plant several seedlings, but you must space them 2 to 3 feet apart.

Water the soil in the growing bag after putting until moist during but not jammed.

See related

How to construct a Small Arbor

Large garden arbors function well as daring focal points in the home garden, however a little arbor functions well to span small garden trails or as a decorative feature in a flowerbed. A 6-foot tall trellis is that the minimum height needed to enable most adults to pass beneath the arbor, but it is possible to scale down the size even further for a children’s play area. Use pressure-treated lumber so that the arbor isn’t damaged from outside exposure.

Dig four 2-foot deep postholes that are around 5-by-5-inches square. Space the back and front post holes about 4 feet apart to span a pathway and approximately 2 feet apart to the arbor thickness.

Set an 8-foot 4-by-4-inch article in every posthole and fill the holes with wet concrete to set the poles securely. Hold a degree from the side of every article to check for plumb. You can screw a 2-by-4 to the article using 3-inch wood screws and then conduct the opposite end diagonally to the bottom to brace the poles while you permit the post to set for at least 3 hours.

Expand 6-foot long 2-by-4s on top of the front poles and back poles with 3-inch wood screws, leaving 1 foot of overhang at each side.

Attach 2-foot long 1-by-4-inch boards horizontally to span the two left poles along with the two right posts, using 3-inch wood screws. Space the boards around 12 inches apart, starting 12 inches in the ground so it’s possible to train vines around the sides, if wanted.

Screw 3-foot long 1-by-4-inch boards to the front and back horizontal 2-by-4s to form the arbor very best. Space the boards 6 to 12 inches apart, depending upon your preference, leaving 6 inches of overhang at the front and back of the arbor.

Brush wood stain or wood water sealer on the entire structure to preserve the wood. Alternatively, paint the wood instead to add color to the landscape.

See related

Mini-Cactus Plants

The cactus family includes a huge variety of succulent plants which change color and size. Some develop into tall columns, reaching around 50 feet high, while some are only a couple inches high and well-suited for growing in pots. All these mini-cacti generally create brightly coloured flowers and take on interesting shapes. You can buy mini-cacti already potted in tiny containers; with appropriate care they can develop indoors while adding color and interest to your room.

Light Requirements

Since mini-cacti are succulents and create colorful blossoms, they require about four hours of direct sunlight each day. A good indoor place is in 4 feet of a south- or east-facing window. Mini-cacti need sunlight exposure evenly, so rotate periodically to make sure that the entire plant receives sunlight. You can tell if the plant receives too much sun by taking notice of its color. Rather than green, the cacti appear white or yellow. Should you have to move a cactus in a high-light area to lower light, do it gradually.

Water

Mini-cacti need well-drained dirt and enjoy other succulents, they don’t need as much water as other plant varieties. Careful observation will be able to help you figure out a watering program for your own mini-cactus. As a rule of thumb, add water once the top half-inch of soil feels dry. When watering, moisten the soil thoroughly, letting it soak up the water, and if it does so rapidly, add more water until it comes from the drainage holes. Many cacti have to be watered once a week.

Fertilizer

Mini-cacti are not heavy feeders, so that they require little fertilization. During active development, it is possible to feed the plants using a low-nitrogen 5-10-10 fertilizer every two or three months. Feeding using a time-released fertilizer is also an option, but only feed the mini-cactus after during spring. You should never fertilize un-rooted or newly re-potted plants.

Winter Care of Mini-Cacti

Mini-cacti go through a dormant period in winter. In this period the cactus requires little or no water. The plant does well using a watering every few weeks. You don’t have to fertilize the cactus because little development occurs during that time. During active growth, cacti require an indoor temperature between 65 and 90 degrees Fahrenheit. During the period, place cacti in a room with a temperature between 45 and 55 degrees.

See related

What's Perennial in Reference to Flowers?

Perennials are defined as plants that live for more than two years. Flowering perennials have a peak bloom period once the flowers are most plentiful. During the non-bloom season, some soft-stemmed perennials go dormant. Certain varieties of perennials are grown for cut-flower production. Some are selected for their fragrant foliage and flowers. Regardless of the reason behind growing perennials, they are a gorgeous, cost-effective accession to the backyard.

Herbaceous Perennials

Herbaceous perennials are plants using non-woody or delicate stems. Through the fall lots of these plants start to go dormant and frequently require pruning into the ground. Even though flowering has discontinued, the origins are keeping up energy to send up new growth in the spring, saving you time and money by not having to replant the garden each year. Some herbaceous perennials will develop woody stems and not go dormant due to the mild winter weather.

Perennial Flowering

With each year of development, perennials will show more growth both below and above ground. Above ground this means that you can anticipate more blooms and color each year. Below ground you can anticipate the origins to be established and require less water and fertilization. To encourage maximum flowering, pruning and dividing perennials is frequently required. Flowering can be inhibited if there are excess weeds competing for nutrients and water in the ground.

Blooming Period

Flowering perennials have a peak bloom period which varies from species to species. To have continuous color in your perennial flower garden, then be aware of each plant’s bloom period and pick a number of plants to stagger the flowering. A well-planned perennial garden can have flowers during the growing season.

Other Flowering Perennials

Technically, trees, trees and shrubs could be considered perennials as well. Several species in these groups have a thriving period and a few expertise dormancy during the winter as herbaceous perennials do. But vines, trees and shrubs have woody stems and even much different growth habits and maintenance requirements compared to herbaceous perennials. Although, by definition, perennials reside more than two years, the life expectancy past that will differ from species to species. This should be taken into account when planning your garden.

See related

Topiary Planting Instructions

Topiary refers to the clipping of shrubs or trees into shapes. These can be simple geometrical types, such as cones or balls, or energetic animal shapes or faces. The custom of topiary dates from the Renaissance, however, the Victorians renewed interest in the art and expanded its domain from estates of the affluent to the cottage garden. Today’s gardener can plant a acceptable cutting and, over many decades, clip it into a design or purchase an established topiary.

First Decisions

Selecting a design has to come first, because this will affect the choice of the plant. For example, spirals work best on junipers (Juniperus) or spruce (Picea). Normally, small-leafed, woody evergreens with dense leaf can withstand the intense pruning necessary for topiary. Recommended shrubs include boxwood (Buxus sempervirens), privet (Ligustrum), holly (Ilex) and rosemary (Rosmarinus). All of these have varieties that thrive in U.S. Department of Agriculture plant hardiness zones 8 to 10a. If you aspire to turn a tree into a mushroom or lollipop shape, where the trunk serves as stick or stem, it is necessary that the trunk be straight with no kinks. Good species to plant are the olive oil (Olea europea) or Chinese banyan (Ficus microcarpa), as well as varieties approved for USDA zones 8 to 10. If you’re beginning with a small plant and training it, support the main stem to keep it straight and remove any competition from an early phase.

Starting from Scratch

Once you opt for the tree or tree for your topiary and purchase a cutting, plant, water and fertilize it based on the nursery’s directions for that species. The plant has to be at least 4 feet tall prior to pruning starts. Topiary sculpting is a very long, slow process; trim plants frequently, but just a little at a time. Shaping a spiral takes six to eight decades. To cut the first spiral pattern in a juniper, begin at the foundation and choose three turns together with the shears, moving upwards to the right. If forming a ball in boxwood, clip the shirt into a dome shape and keep rounding the mass in subsequent decades. Keep moving, never dwell too long in 1 spot. Before starting any cutting, place a cloth on the ground around the plant to catch the clippings.

Beginning with a Purchased Topiary

After bringing your topiary home, either plant it in the ground or transplant it into a permanent container. Care for it as you would the identical plant in the natural condition. Glazed ceramic or plastic pots are suggested over unglazed terra cotta, which dries out more quickly. By purchasing a topiary which was years in the making, you’re accepting responsibility to keep it. After the established pattern, trim every couple weeks during the growing season, removing just a bit at a time so you will have no regrets.

Topiary Warnings and Alternatives

A Florida company of landscape managers cautions about badly pruning trees, where 60 to 70 percent of the canopy is eliminated in the course of creating a topiary. They say such therapy dramatically lowers the trees’ lifespans. Shrubs are hardier and tolerate pruning better. As options, the group suggests two other topiary techniques which are simpler on plants. In the first, grow a bush inside a wire frame. As the branches extend beyond the framework, clip them, little by little. The other technique applies a wire frame filled with moss. A fast-growing vine, such as creeping fig (Ficus pumila), suitable for USDA zones 8b through 11, is planted outside the frame and permitted to cover it.

See related

The Ideal Distance Between Indeterminate Tomato Plants

Short, compact varieties of tomato plants (Lycopersicon esculentum) grow to a certain height and blossom and bear tomatoes in a short harvest period. Tall, sprawling tomato plants — called indeterminates — continue to grow, flower and bear tomatoes until they are killed by the first fall frost. Normally, these larger tomato plants are supported by stakes or wire cages.

Transplant Basics

You can grow indeterminate tomato plants from seed or purchase transplants from a nursery, a frequent practice in areas with a short growing period. The seedlings need to be 6 to 8 inches tall until you plant them on your garden. After being watered thoroughly, they are best planted at least 2 inches deeper than they were at the grass. Planting tomato seedlings in the late day prevents them from losing water from drying soil. How far apart you plant them depends on whether you plan to support them using wire racks, staking them, or allowing them to sprawl on the ground.

Spacing Caged Indeterminate Tomatoes

Growing indeterminate tomatoes in acylinder or rectangular wire cages enables the plants to develop naturally and spares you the chore of having to occasionally tie the plant to a stake. You can purchase ready-make tomato cages from most garden supply centers or make one yourself by bending wire fencing or even concrete reinforcing wire to your cylinder. A supporting cage should have openings of 6 inches between the wires so that you may reach into harvest tomatoes. Indeterminate tomato plants require a cage that’s out of 18 to 36 inches wide and 6 ft tall. If you use a cage to back up your plants, allow 24 to 30 inches of space between plants and 30 to 42 inches between rows.

Spacing Staked Indeterminate Spaces

Indeterminate plants backed by bets also require 24 to 30 inches of space between plants and 30 to 42 inches between rows. Sturdy wooden stakes, 6 ft long and 1 1/2 to 2 inches broad are pressured 1 foot into the soil from 4 to 6 inches apart from the indeterminate tomato plant. As the tomato plant grows, gardeners use twine or strips of fabric to tie the tomatoes to the stake every 10 inches.

Spacing Indeterminate Tomatoes that Sprawl

Indeterminate tomatoes can be permitted sprawl out on the ground rather than being staked or caged. However, this more frequently done with determinate tomatoes because the larger indeterminate plants develop in a snarl making the tomatoes difficult to harvest. Tomatoes lying around the soil is an an invitation to decay; placing landscape fabric or mulch around the ground may help guard them. If you allow them to sprawl, plant them 3 to 4 ft apart using 4 to 5 feet between rows.

See related