Browse Month: October 2017

The best way to Install Vinyl Siding Over New Insulation

Vinyl siding is a durable substance that resists deterioration. Vinyl to-day isn’t susceptible to decay from water or exposure to salt-air or other problems that impact siding, and WOn’t fade, even in warm sunshine. Vinyl siding may be utilized in development that was unique or as as a substitute for outdated siding. It usually is installed over foam board insulation fixed to wood wall sheathing. Insulation offers a smooth area for vinyl that permits contraction and growth. A moisture-barrier before vinyl is installed house wrap typically is set on the insulation.

Cover the home partitions with 4 by-8 foot sheets of rigid foam , usually that is insulation 1/2 to 1 inch-thick, nailed to wood sheathing with 11/2-inch wide- headed nails every to that are 16 18-inches. Put up sheets that are complete, then use a drywall saw to cut out openings for doorways, windows and utilities. Secure edges and the seams around openings with tape to coordinate with the foam insulation.

Snap a level chalk line all of the way across the house at the end of the partitions, using a tape level, measure and chalkline. Fasten a steel strip along this line, utilizing galvanized broadhead vinyl siding nails about 16-inches apart. Leave at least a 1/4 inch gap between strips and at the corners for vinyl J-channel and set nails in the middle of the slots that are horizontal to permit growth.

Install J-channel molding at all corners and around windows and doorways. Use an amount to get vertical J-channel plumb. Utility or fasten undersill trim in the tops of walls and at the bottoms of windows. Nail these trims in the middle of the slots and enable minor room for growth. Install unique trims around electrical shops, outside faucets or other utility providers.

Overlap J- utility and channel trim sliding that piece to the complete conclusion of the trim and where required by reducing the corner. Leave trim parts that are specific free until wall panels are installed around them.

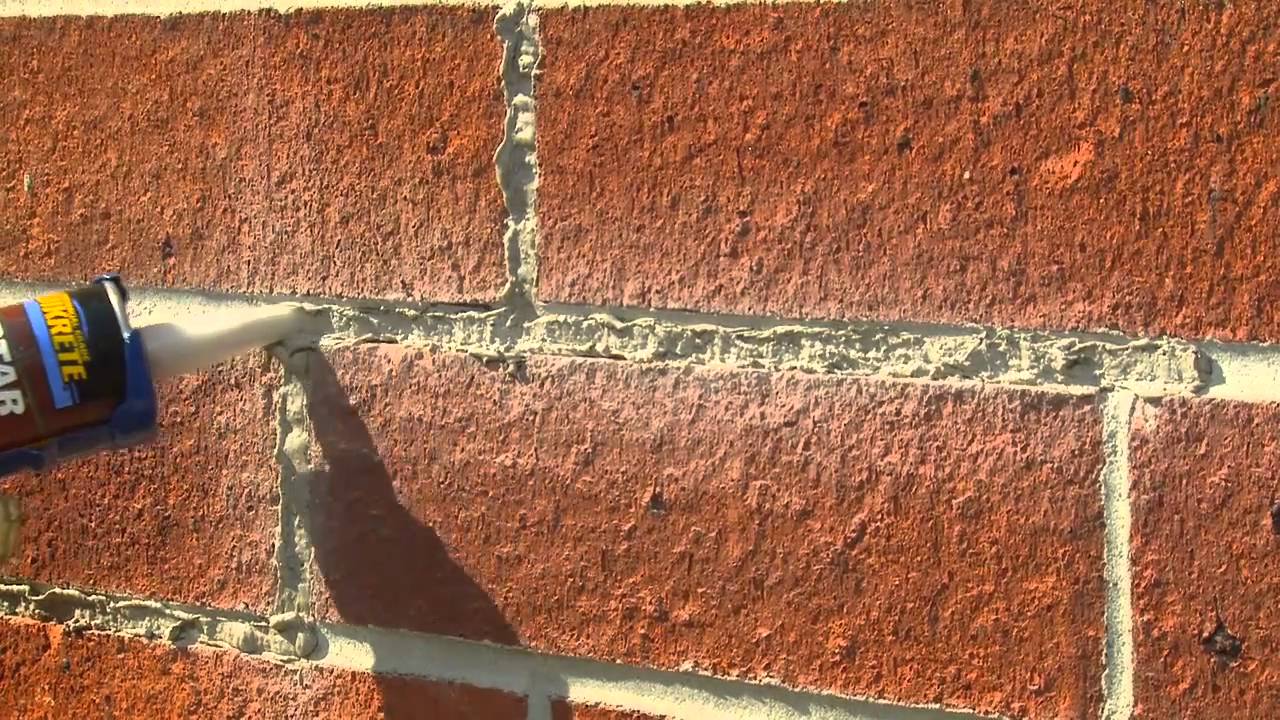
Start in the rear of the home to install siding panels. Slip the backend in to the corner J-channel of a panel and snap the bottom in to invest the strip. Leave a-T least 1/4 inch area inside the channel for growth; vinyl panels will be free to shift or should broaden and contract with warmth and chilly and they’ll buckle. Fasten the panel with nails in the guts of the nailing slots about every 16-inches. Do not push nails completely; abandon about A1/16-inch gap under the heads.

Add another panel, over-Lapping the first from the entrance by about a-T least one inch. Snap that panel in and nail it in spot. Continue to a DD panels to another end of the house. Trim the panel to to suit inside the J- trim it brief, s O there’s a growth gap.

Start an additional row of panels from your back having a portion-panel, therefore the seams don’t fall into line over the house. Snap the bottom of this panel to the very top of the panel and fasten it together with nails. Continue to include panels up and along the wall. Use alevel about every third-row to keep the panel tops level. If the le Vel slips a bit, make minor changes as required; do not decide to try to over come a big dip all a-T one time, but change a couple of rows to get straight back to le Vel.

Cut panels to to suit around doorways and windows and other openings with tin snips. Before cutting measure vigilantly and mark the panels; constantly reduce short, to enable room for enlargement. Use easy-lock punch to puncture the flattops that are cut of panels to to slip into utility trim in the top of the wall as well as the bottoms of windows. Make sure that the punch lugs are around the not in the panel.

See related

Instructions On How Best to Change a Tub Drain Overflow

The water flows out of the primary waste-water your bathtub via two channels drain as well as the over flow drain. The overflow is situated behind the cover which is installed immediately above your tub drain and under the the faucet. As time passes, the over flow drain can become clogged or corroded with hair and other particles carried using the water in to it. In the event the primary wastewater drain is working in excellent situation as well as correctly, it is possible to replace the over flow drain. It is a task that many homeowners can do themselves, with no pricey visit in the plumber.

The screws on the over flow drain protect using a screw-driver. Remove the cover and set it apart.

In order to begin to see the pipes on the other side of the tub, open the entry hole. This can be typically positioned on the wall copying to your bathtub’s pipes. Find the studs in the wall using a stud-finder when there isn’t any access hole.

Mark the studs’ area in the foot of the wall having a pencil, and after that cut a gap between these lines using a drywall saw. Try to keep the cut as clear as possible, so the panel can be replaced by you, and reduce to expose the stud.

Loosen the slip nut that retains the over flow pipe to the wastewater drain’s T-fitting by turning the nut counter-clockwise using locking pliers. In the event the nut doesn’t change, use a drop of lubricating oil that is of sunshine to it, and leave it to soak for a number of minutes. This ought to make it flip easier.

Lift the over-flow pipe from the wastewater’s T-fitting. The fitting should be lifted straight from by the over flow pipe.

Measure the duration of the over flow pipe to the bottom of the part from your part that is curved and slice the the over flow that is new to the sam e dimension utilizing a hack-saw.

Slide bushing and the slip nut which should be provided using the new over-flow pipe on the conclusion of the area that is straight.

Place the end-of the over flow pipe’s straight area to the T-fitting of the wastewater drain.

Turn the overflow pipe therefore the opening in the curved conclusion is facing toward the opening on the bathtub’s over flow.

Slide the bushing after which the slip nut on the most effective of the wastewater drain’s T-fitting, and after that tighten the slip nut with locking pliers. When the nut is tightened by you, it pushes the bushing contrary to the T-fitting to produce a water-tight joint.

Place the new over-flow drain protect contrary to the bathtub’s over flow opening and fall into line the screw-holes. Insert the screws in to the drain cover’s mounting holes, and fasten it in spot utilizing a screw-driver.

Fill your tub with water till it reaches over the over-flow drain protect, and analyze the pipes on the other side of the tub for leaks. Tighten the slip nut if required and after that drain the tub.

Replace the access panel to the wall. Set it straight back in location, and after that fasten it to the studs utilizing dry wall screws in the event you cut a piece out to create a panel.

See related

The best way to Join a Metal Sink Drain Tail into a Plastic P-Trap

Replacing a P-trap is if you need to combine plumbing stuff to get the job finished, a little occupation which will appear more complex. The area of the drain assembly that goes below the sink is known as the tailpiece, plus it is typically made from metal. P-traps can be steel or plastic. The plastic types are more straightforward to install and corrosion-resistant, therefore so can be more generally used. It’s not a problem if the two parts are made of substances that are dissimilar, because the flange that seals the trap opening is constantly plastic. So do not be be intimidated. Place to function and also you will save yourself the price of a Bay Area support contact.

Compare the relative diameters of the P- tailpiece and trap by sliding the mouth up the tailpiece and by eliminating the nut and flange in the mouth opening. If it only fits, they can be the same diameter, but the width of the tailpiece is likely 1 1/4 inches while that of the snare is 1 1/2 inches. if there is a a big opening In the event the latter is true, use the thicker of both flanges that came together with the P-trap assembly to help make the the bond.

Slip the nut upwards using the threads facing down, slide it up and then match the flange over the tailpiece.

Add the conclusion of the tailpiece to the trap opening until the opening is somewhat greater compared to drain opening in the wall and slide the trap up. In the event the opening is not greater than the drain, the trap might leak, no issue how significantly it tightens.

Slide the flange down the tailpiece and match it to the trap opening slide down the nut and twist it to the trap. Tighten the nut just as much as possible by hand.

Twist the opposite end of the trap to the drain line, which should possess a adapter. Tighten the the bond byhand, then tighten the nut at the center of the trap yourself.

Fill the sink, then open the stopper and make it possible for the water. Scrutinize your connections. Tighten them more, if any of these leak. In the event that you if you fail to tighten them enough by hand, you may require to make use of a pipe wrench or pliers.

See related

The best way to Cover Ceilings

Your ceiling is a possible method to conceal defects in an area. Ceiling covers conceal flaws and spots, and will minimize the look of a ceiling. Select the best cover for the ceiling to help make the room seem more encouraging, bigger, smaller or dimmer. Several choices can be installed by a typical homeowner without contractor expertise.

Popcorn Feel

Popcorn feel merchandises are among the least complex methods to reach another appearance to your ceiling and hide spots or flaws. They are also a cheap solution to offer the area a facelift before leasing or selling the house. The popcorn feel brushes or aerosols on, supplying a bumpy, appearance that is haphazard. Such a ceiling cover continues for years with no care other than dusting and uses with minimal exertion.

Wallpaper

It is possible to cover your ceiling with wall-paper as you do your partitions. The setup is exactly the same, soaking the paper before installing and using paste. Wallpaper can be found in numerous designs, designs and textures. The wall-paper installs from a utility knife around lighting with just several cuts. After the adhesive has dried, it is possible to paint the chamber to be matched by the papers.

Pressed Tin Panels

Tin panels are big sheets of metal which can be stamped using a design. The panels are nailed to the ceiling together with assistance from strips placed round the border. Installing these panels, which continue considerably more than feel or paint, usually needs a helper. Tin panels offer complete coverage for stained or broken ceilings where holes continue to be noticeable after patching. Paint the panels to complement the chamber or have their natural colours as soon as they are installed.

Ceiling Boards and Tiles

Boards are just one method and never having to put in a fall ceiling to get yourself a ceiling appearance. Staple or glue wood boards to the ceiling. The ends are usually groove and tongue, producing setup a breeze. If it’s degree tiles could also be pasted straight to the ceiling. Otherwise, install tiles utilizing strips. Ceiling tiles are constructed of fiber-board composite materials and a wood. Tiles in the centre out. Create border tiles for the border of the chamber by scoring tiles having a utility knife, measuring attentively and snapping them apart.

See related

The best way to Put In a Kitchen Cabinet Hinge

Fresh cupboards arrive set up already with all the doors. If you’re intending to renovate your kitchen cupboards, components and installing hinges does take time time, but it’s a straightforward upgrade. Maintaining your base cupboards and replacing just the cupboard doors saves work and cash in the event that you would like to revamp your kitchen. Go to modern with components that is new, or keep the allure of cupboards that are older by buying hinges made to mimic metalwork that is classic. Besides removing saggy, twisted doors, hinges that are new will make the doors operate smoothly and quietly.

Prepare Cupboards and Doorways

Count the precise amount of hinges you assess and need the dimensions of hinge now on the cupboards. Cupboard doors which can be up to 24-inches tall usually got two hinges per door, spaced about 5″ in the bottom and top borders of the doorway. Large wood cabinet doors seen in older houses and taller doorways must have a hinge centered between the bottom and top hinges. Purchase new hinges which might be the right size to support the kind of doors in your cabinets.

Unscrew the present hinges in the cupboards and lift the doorways off. Unscrew the hinges in the doors.

Fill the screw-holes by trimming the area flush and pasting a little dowel or tooth picks. Subsequent to the glue dries completely, sand the area easy. Complete the region in case you are refinishing or painting, or to coordinate with the first doors and the whole cupboards, do that. Redrilling types and filling the aged screw-holes ensures a a good match for the new install.

Attach Hinges and Doorways

Put a hinge briefly on rear or the front of the do or, with respect to the kind of hinge. Align the hinge together with the border of the cupboard door. Align the leading and bottom hinges, employing a tape measure for exact spacing. Indicate the place of the hinges by etching using a pencil through the screw-holes, little or awl nail. If needed, indicate and assess the centre point to place a hinge. Take away the hinges after marking.

Drill manual holes for the screws part way in to the cupboard door in the factors that are marked, employing a drillbit smaller in relation to the screw. Tend not to drill totally through the entranceway. Screw the hinges to the doorways.

On the cupboards employing a level on the other side of the underparts of the the doorways for alignment gauge the door arrangement locations. A straight edge slim plank across the le Vel-line as a short-term positioning marker. Utilize a step ladder to securely achieve upper cupboards. Allow the doors relaxation on-the-edge of the plank for support while the information holes are marked by you and screw the hinges in to position. For doorways that don’t satisfy in the middle closed place, minimize the breadth of the space needed involving the shut doors to a bit of wood, and utilize it as a jig between each pair door to reach spacing. Hold each do-or in position and mark the hole locations on the cupboard face using awl, a pencil or little nail.

Transfer the doorways outoftheway. Drill guidebook-holes for the screws to the cupboard face in the factors that are marked. Reset the doors on the straight edge that is clamped, align the hinge twist the doors into position, and holes.

See related

The best way to Finish Utility Oak Flooring

Utility grade oak flooring may include grain versions and cracks, knots, scars. While -level oak frequently can be used in residential uses that are proper, utility grade is appropriate and not as expensive when a appearance is wanted. As a result of the imperfect character, utility grade oak flooring needs more substantial sanding and preparing than pick or maximum-quality oak. Finishing the flooring needs at least a week end, and more if you can find cracks and holes to fill.

Initial Sanding

Utility grade flooring takes an excellent deal of sanding and prep work before applying the the final. An -design floor evens the floorboards and eliminates irregularities that are marked. Smaller, handheld power sanders are employed just around edges as well as in corners that were tight. Sanders possess a cylinder on the underside that rotates toward the ground. Belt- or tube shaped sand-paper matches round the cylinder. These hefty machines need steady forward movement and a solid hand that follows the grain of wood as well as the floorboards. It could grind a groove to the wood, in the event the sander stays in a single place too long. For the best results, completely sand the ground once with each grit of sand-paper, from coarse to ultra-good, before implementing sanding sealer.

Filling Cracks and Holes

Cracks and knots in utility-grade split, oak flooring are attractive in a few applications but are a pain if a ground that is smoother is wanted. Rather than eventually chip out and filling cracks and openings with wood filler, which may crumble, try another approach. Gather fine-particle sawdust from the initial class of sanding the ground and combine it with oil-based polyurethane to produce a heavy paste. Filling cracks and openings with this particular paste combines the irregularities using the remaining flooring, as well as the repair connection is helped by the poly urethane with all the wood. The fixes are dense, in order that they may need several days to dry. It’s possible for you to continue following the paste isn’t any longer tacky sanding.

Orbital Sanders

Orbital vertical machines most frequently are utilized as flooring buffers before applying a brand new layer of finish, or to scuff completed flooring. When finishing a utility grade flooring, orbital sanders with ultra-good sanding display lightly smooth the grain occurring after applying sealer. In smoothing little irregularities between layers of finish, they are found. The sandpaper that is required and drum and orbital sanders can be found for lease a-T many do-it-yourself facilities.

Flooring Finish

Oil-centered polyurethane is just one of the very frequently encountered flooring finishes. It’s long-lasting but requires a-T least day when temperatures are above 50 levels to dry. Indoor temperatures needs to be modulated between 65 and 70 degrees to get the best results. Oil-centered polyurethane additionally adds a gold tone that changes the shade of the oak. Water-based polyurethane dries quicker and has less odour than oil-centered, therefore needs refinishing more frequently, but it scratches effortlessly. Water-centered polyurethane doesn’t add tones that are yellowish, so it’s a flooring finish that is truly clear. In the event you decide on petroleum-based goods, in addition, you might require mineral spirits to wash your resources.

See related

How To Repair Mortar Joints

Learning to repair mortar joints will help you prevent water and structural damage to your home. With the right tools, you can repair mortar joints faster. When masonry joints start crumbling, things get ugly fast, and before you know it, the bricks are too loose and the water starts seeping behind your handyman Mesa.

Tuck pointing is an easy way of repairing the joints on your own. If you do not do this, the joints will keep deteriorating and you will even have bees making a home in the mortar holes. This is not an expensive process. Simply find some free time and get the handyman in Mesa AZ repairs done.

The following are some steps that will help you repair retaining walls, chimneys and brick walls. However, take note that in the case of a shifting foundation, tuckpointing will not fix the wall cracks or crumbling bricks. For those, you might need to hire an expert.

Get The Required Tools And Materials

You must have a 4 – inch or a 4 ¼ inch diamond blade. While you can get one of these on a lease, it’s better to buy one since it only costs a few dollars. Visit the nearest home center and get some specialty hand tools like a tuck pointer and a brick trowel.

You will also need a masonry jointer in case your mortar joints are concave or a joint raker for flat joints, and a cold chisel, hammer, mortar mix and a rotary hammer drill.

Getting Started

With only a few joints to deal with, it’s easy to get things done. However, if the damage is extensive, you must start with a small section so you know the level and extent of damage before you start chopping off the entire wall. Remember that after mixing mortar, you have between 30 and 60 minutes to work on a section.

Dealing With Dust

This is a project that’s very dirty and dusty, especially when grinding the joints. Have a drop cloth on site and you will only have to spend a few minutes to clean-up after the work is done. Without the drop cloth, you will spend hours. Make sure that you alert your neighbors of the project and keep the windows closed.

Grinding The Joints

For horizontal joints, grind along the bottom and the top. Make sure you grind as close to the bricks as possible. The damaged material must be completely cut and removed before you can add new mortar in the joints.

It’s recommended that you start from the corners and then work your way inwards. This way, you will not heap unnecessary pressure on the bricks at the corner, which can easily knock them off the wall.

Hammering The Mortar

While chiseling the mortar out, move the rotary hammer drill along the joints. Carefully pound the mortar from the joints. It’s easier to remove the mortar with a drill but you must be very careful not to knock the bricks out because the drill is a powerful tool.

In case you accidentally knock off the bricks, just use the chisel to remove all the mortar, refill the joints and then reset the bricks.

With mortar flying all over the place, this can be a dangerous process. Therefore, make sure you have the right eye and ear protection gear.

The best way to Analyze for Disconnected Heating Ducts

Monitoring gaps in your warmed air distribution down help you to stay warm and can help you save money. The California Energy Commission proposes that home-owners make use of the Home Energy Rating System (HERS) to ascertain their house’s energy efficiency. Air techniques and house heat that rating large waste power. The County of Ventura indicates that home-owners have their ducts examined every seven years to find any leaks. Between reviews that are accredited, situate gaps in flow of air using a couple of family things.

Slide shut all the port registers except the one you’re examining. If testing greater than one duct for heat alternative openings to find heat reduction, reduction.

Cut on a blaster fanto the one staying opening duct sign-up. Turn on the heating plant, enabling it time to warm and start to blow atmosphere. Find the fan blades that are duct. In the event or just go don’t whirl, the duct is disconnected. Fan blades that whirl readily suggest the duct is joined correctly.

Tape a-6-inch bit of bathroom tissue to the sign-up that is duct. Turn on the heating device watching to get several seconds in the tissue. In the event the tissue moves and strikes, the duct is connected. The duct isn’t linked in the event the tissue doesn’t proceed.

See related