Browse Category: Eclectic Homes

Guest Picks: Stylish Toy Storage

Christmas is a time for giving, and children tend to get given a lot! If you’re looking for some suggestions to keep the masses of toys in a stylish manner this holiday season, here are 20 to get you started. — Maddie from Li’l Magoolie

Modern Kids Toy Boxes & Benches – GBP 229

What kid wouldn’t go crazy for an oversize LEGO block toy box?

rededition

Grande Blanche – EUR 185

Following is a toy box that is anything but square. This work of art would be as stylish in a grownup’s area as in a kid’s.

POMPOM

Safari Drum – AUD 60

The Pomdrum is entertaining toy storage in a drum!

Tulp Kids

Dutch House Shaped Storage – AUD 2,099

Turn your kid’s toy storage into a vibrant street in Amsterdam.

The Maude Toy Box with Book Cubby by Mod Mother Furniture – AUD 425

This handmade toy box by Mod Mother Furniture also has a novel corner included.

DwellStudio

Owls Sky Cylinder Storage Bin – $120

DwellStudio’s Owls Sky bin is light enough to lift and tall enough to keep a lot of toys.

Etsy

Wolli Snow Mountain Toy Box by Babies Breath – $180

This handmade Wooli Snow Mountain box is a part toy storage and part play background.

ViaBoxes

Big Play Table – $399

Viaboxes are modular systems that could go from table to bookshelf formation depending upon your area’s dimensions and shape.

Fox Storage Bin – $39.99

This 3 Sprouts storage bin is completely foxy.

The Land of Nod

Children Flea Market Wire Ball Bins – $35

These wire baskets would include an industrial sense to your kid’s room whilst still letting you see what’s inside.

Modernseed

P’kolino Chalkboard Storage Bench – $69

This P’kolino toy box could be wheeled from room to room, and it doubles as a chalkboard dining table.

Artisanti

3 Luggage Storage Cases – GBP 254

Vintage suitcases include a retro feel to any room and are excellent as sturdy storage for kids’ toys.

Clever Tomato

Oeuf Toy Store – $498

Set up shop whilst keeping your toys with this classic market shelf system.

P’kolino

P’kolino Ottoman – $229

It is an ottoman and it is storage. Win-win!

Clever Tomato

Kalon Studios Changing Trunk – $520

This toy box doubles as a changing table. It is a convenient addition to any nursery.

Bebe Online

Magis El Baul Toy Box – AUD 849.95

Possibly too beautiful for a kid’s room, this golf-ball-like storage would also double nicely as a bench seat.

Metro Mum

Trunki Ride On Traveling Toy Box, Blue – AUD 34.95

The Trunki toy box shown this is easy to maneuver about and doubles as a ride-on toy.

The Land of Nod

Kids Metal Locker Storage Baskets | Land of Nod – $16.95

Go for an industrial look for this metallic locker basket .

Childs & Co

Children’s Contemporary Toybox – GBP 128

The Childs & Co toy box opens out and comes in vibrant colour options.

UrbanBaby

SkipHop Bin-Go Big Storage Bin – AUD 59.95

With the SkipHop Bin-Go, you’ve got storage you can carry and then fold away if vacant.

Next:
Post-Christmas Conundrum: Toy Storage

See related

Troubleshooting a Kenmore Washing Machine Whose Spin Cycle Is Not Working

Kenmore makes washing machine in a variety of models, including top- and also front-loaders and high-efficiency units that save on energy costs and water consumption. But when your washer isn’t working correctly, the loads may quickly stack up. If your washing machine is experiencing a problem with its spin cycle, your laundry will still be soaking wet once you take it outside. Several problems can cause the spin cycle to fail to work, but it is possible to troubleshoot yourself without undermining expert aid.

Check Spin Speed

Your Kenmore washer automatically chooses a spin rate based on the cycle that you choose, but you can change the preset rates if needed. Heavy, bulky things can slow down the spin cycle if the chosen speed isn’t high enough. If you are washing a hefty load, then consult your owner’s manual to pick out a cycle using a medium to high spin rate to ensure that the cycle closes correctly. To change a preset rate setting, select a cycle and apply the Kenmore’s Spin Speed button to manually adjust the spin rate. Keep in mind that higher spin rates can cause more wrinkling in completed loads.

Assess for Jammed Basket

Your washer can neglect to spin if the clothing basket becomes jammed since small things are caught between the tub. If a clothing item, such as a sock, has gotten trapped in the gap, carefully untangle the article and remove it. For smaller things, you might have to use your fingers to achieve under the basket. To prevent the problem, empty the pockets of pants, shorts, jackets, shirts and other clothing before putting them in the washer. Utilize a garment bag to store smaller things from getting trapped beneath the basket.

Adjust Load

Your washer might not spin due to various common loading issues. An overloaded washer might become tightly packaged, which can stop the basket from spinning correctly. Eliminate a few things and restart the cycle. A washer might have trouble spinning if a load is too small, also. Insert a couple of similar things to the basket. In some cases, the load might be the right size but not correctly balanced. Rearrange the moist clothing so it’s spread out evenly throughout the basket to permit for proper spinning.

Utilize Proper Detergent

If there are too many suds on your washer, spinning can be slowed or stopped. In most cases, excessive sudsing occurs since you use a lot of detergent or you have a high-efficiency model and also utilize a non-HE detergent. Always read the detergent’s label to ascertain the proper amount for the load, and read your owner’s manual to make certain whether your version of washer necessitates HE detergent. To remove excessive suds from your washer, run an additional cycle and rinse without inserting any more detergent.

See related

8 Dream Closets Move Beyond Storing Clothes

Previously the bedroom closet was the place. Now the emphasis will be on producing functional, organized cabinets which double as comfortable places to hang out, play and work.

Giambastiani Design

Spa-like escape. This revived 1910 bathroom, designed by Solomon + Bauer + Giambastiani Architects, has a modern vibe with a definite slant toward pampering. Its generous glass sliding doors display towels and robes while displaying the room’s spaciousness.

MB Jessee

Room with a view. While most cabinets can not offer a view (perhaps there’s no room to bring a window, or it is constructed within an interior area), this closet takes benefit of its own vantage point from within San Francisco’s Millennium Tower.

A seat provides additional shelving to make up for any missing storage space or a dedicated seat to enjoy the sights. The window theme continues through using frosted glass doors and a cabinet topped with glass.

GILL & FEATHER ARCHITECTS

Library effect. Architect Dan Featheringill of Feather & Gill Architects gave this closet the qualities of an elegant analysis, together with bird’s eye maple paneling and hickory floors that were blackened with a stain from PureColor. Wood appliqué ceiling tiles have been selected in a pattern similar to that of their customer’s favourite store: Chanel.

Warm lighting and a comfortable chair provide a cozy spot for getting ready or curling up with a book.

Taylor Hannah Architect Inc

Corner workplace. A sizable closet is a gorgeous thing, although not everybody has the space to devote just to garments. By placing a desk in the closet, like architect Taylor Hannah did in this spacious setting, it is possible to use one inspiring space for 2 purposes.

Martin Perri Interiors, Inc..

Boutique. Martin Perri Interiors created this design as part of a European modern job to emulate a luxury boutique. High-gloss polyester lacquer cabinets set the stage for accessory displays behind half-inch glass doors. Motion sensors turn the cabinetry’s backlighting on when someone enters the space. Additional LED side lighting is provided by manually operated switches. An embossed leather stools sits prominently in order to give the homeowner an opinion of her wardrobe choices. Plush carpeting atop bamboo flooring adds comfort to the dressing experience.

Art gallery. Why should the clothes and accessories receive all of the adulation? Art is a wonderful opportunity to add colour, beauty and possibly a little bit of amusement to the dressing experience.

This cupboard’s rich, monochromatic palette, designed in keeping with the remainder of the sophisticated residence, creates a slick background for an art exhibit that reflects the customer’s nautical fire.

Other chances for any closet include framed photographs of relatives and pets, and inspiring fashion shots.

Cablik Enterprises

Party pad. Wake up and get excited to begin your day by means of a vibrant colour. This closet, part of a whole-house renovation designed by Dencity and constructed by Cablik Enterprises, includes vivacious purple cabinets from Kingdom Woodworks.

The modern chandelier paired with shag carpets and a polka dot love seat would make anybody want to crank up some tunes and have a good time, no matter what time of this morning.

Walker Woodworking

Washing-dressing room. Can you think of a better time saver when it comes to laundry than creating a closet around the laundry room? Or is it? Walker Woodworking designed this clever double-duty space as part of a home renovation to empower good chore flow.

See related

10 Ways To Give Your Hospitality a Tropical Touch

Why settle for casual hospitality when you can treat your visitors to tropical hospitality? Below are a few very easy and innovative ways to make your guests — not to mention yourself — feel like they’re staying at a bed-and-breakfast amid swaying palms and with a turquoise sea.

1. Put your memories on display. Switch up your screens and bring out a few of your favorite things for a complex game of show and tell. An artful arrangement of tropical memorabilia, postcards or publications is guaranteed to find some fantastic conversations started, particularly if they tell an interesting story.

To keep your shelves from looking too cluttered, stick to a limited color scheme, or pick a color to tie it all together visually. Here I’ve used a printer tray that has been given to us as a present by a friend, who happens to be an authority on tropical drift seeds; a few of those seeds are suitably scattered through the display. The wood tones are repeated with all the shelves and also the shadow box, drawing attention to the shells, vase and art.

2. Display and serve tropical fruit. Unearthly-looking pleasures are exciting for visitors to admire and devour. Head to a local specialty market, farmer’s market or ethnic market and keep a watch for exotic fruits, such as the rambutan and guinep shown here. You will have a great deal of fun tasting some thing fresh, and it’s guaranteed to be an unforgettable experience for your visitors.

Research the fruit so you can make it a safe and enjoyable experience for all. In the minimum, it is going to make you sound smarter. If dragonfruit and snotfruit sound too frightening for you, exhibit a pineapple instead. It is the global symbol of hospitality.

Martha O’Hara Interiors

3. Use bold leaves as striking arrangements. Just a single leaf could be all it takes to make a room say”tropical.” Clip a leaf or two off a houseplant such as the parlor palm (Chamaedorea elegans) or kentia palm (Howea fosteriana) to make your room feel as though it’s shaded by swaying coconut trees. They are sometimes placed in a vase such as the one displayed here, made to a organic table runner or exhibited on a wall, mantel or windowsill. In the absence of palm fronds, the leaves of additional leafy tropical plants will do well.

4. Incorporate tropical art. This painting by my mother, Nancy Asbell, is more than simply art; it’s a window into a cheerful and bright Florida scene painted by somebody who lived life via the strokes of her paintbrush. But perhaps I am biased, since she had been my mother, after all. Regardless, the appearance is made complete with a rattan box plus a glowing wire candleholder.

You do not have to get an original painting to find this appearance, however, and economical alternatives vary from a framed and enlarged picture to a popular tropical print that has been wrapped around a framework such as a painted canvas. You might even roll ink over a palm frond and make a print by putting it onto a big sheet of superior paper, letting it dry and putting it in a mat and frame. You likely have some other neat ideas of your own.

Amoroso Design

5. Bring the houseplants centre stage. Houseplants are often overlooked and awarded the part of supporting actors in the unfolding drama of decoration, but a well-situated specimen becomes a sculptural work of art and ties rooms into the world outside the windows. If you do not possess a houseplant already, you can get massive palms and other architectural specimen plants for roughly the exact same price for a bouquet of flowers.

This chamber uses a muted color scheme, tropical wood textures and a fun zebra print for an exotic appearance that draws attention to the glowing green white bird of heaven (Strelitzia nicolai) in the corner. If you are new to houseplants, follow the directions on the tag or search on the internet for tips. Generally speaking, just make sure you give it plenty of bright (but not direct) light so it is easily admired and healthier to boot.

8 Houseplants You Can’t Kill

6. Create texture with unusual collections. Sleek and minimalist furnishings could be awarded interest and warmth with a little bit of natural feel, particularly if the pieces tell a story, such as the sea beans displayed here. (But since they were meant to begin a conversation, you’ll have to ask about them in the Comments to discover more.)

The most mundane items can dress up a dull table without adding clutter. A flat-woven tray of coffee beans not only appears rich and exotic; it smells fantastic and encourages guests to conduct their hands through the tablescape while they await dinner. While the pinecones or seedpods on your backyard might not technically be tropical in origin, they will still look that way in the right setting.

7. Create the necessary arrangements. If you own a houseplant or possess some tropical bulbs in the backyard, think about combining them with cut flowers to create your own artistic flower structures. Just about any flower would fit right in with the help of large and bold tropical foliage, but nearly all of the flowers (with the exception of the green cymbidium) inside this wedding arrangement were clipped from potted tropical plants on my balcony.

When tropical flowers and foliage are hard to find at your regional florist, head to the houseplant part of the garden centre and begin looking for a plant that could take care of a light pruning. Peace lilies (Spathiphyllum wallisii), split-leaf philodedron (Monstera deliciosa) and anthuriums (Anthurium andraeanum) are all houseplants that may be clipped and additional to flower structures.

8. Collect vacation memories. A postcard can be made to a work of art with the help of a photograph frame, which spiny lobster appears to blend right into the natural habitat of dark wood and interesting beachcombing finds here.

Shadow shelves and boxes create perfect display spots for found treasures like seashells and memorabilia that could otherwise languish away into a darkened cupboard, but the possibilities are infinite. Make your own British colonial curiosity cabinet with whatever treasures you’ve stowed away. Even decidedly’untropical’ subjects are able to appear exotic and intriguing when handled like a museum’s most precious collection. What fun screens can you come up with?

Design Studio -Teri Koss

9. Put flower vases in unexpected places. A flower arrangement on the dining room table is nice, but a display livening up a hallway, foyer or toilet speaks volumes regarding your thoughtfulness and hospitality. At a pinch you can even purchase (or reduce your own) flowers and split them up for two structures to spread cheery tropical taste around the house.

When you have a plant in the backyard with fragrant flowers such as the gardenia (Gardenia jasminoides) or moonflower (Ipomoea alba), consider floating them into a bowl on your toilet sink so they can give their odor into a most unaromatic place.

10. Choose some flowers. You definitely don’t need an whole flower arrangement to bring the tropics to your tabletops; an iconic hibiscus flower in a coral-patterned vase is everything it takes to make you feel as though you’re vacationing in Polynesia. This flower was plucked from my garden in Florida, but hibiscus plants and other trademark tropical favorites such as heliconias and gingers are usually available at the garden centre as seasonal container plants. Purchase one for yourself and use the flowers and foliage all season long.

You do not have to go overboard with tiki kitsch to make guests feel as though they’re staying at a hotel. An artistically organized display of well-chosen items is all it takes to bring a little exotic excitement to your home, and it does not have to cost a dime.

See related

The Easiest, Most You StandMake

Should cake have all of the fun? Cake stands can display a number of different foods, such as fruits, snacks, candy and cupcakes, serving as great sandwiches and figurines to your own parties. So if you’re hosting a holiday resort, birthday party or baby shower, or simply have a celebratory event, repurpose your secondhand or flea market finds into a delightful way to elevate your yummy treats. All you will need is a hot-glue gun along with some sturdy dishes to mix and match. Below are four stand styles.

Rikki Snyder

Bold colours and Fun Shapes

Utilize your cake rack to display fresh seasonal fruit. Add bright color to a tabletop or a room by choosing vibrant colors. Try using unexpected contours, such as oval platters.

Rikki Snyder

Materials:

Glue gun
Extra glue sticks
Inexpensive bowls and platters of various shapes and fashions

Tip: make certain the bowls you select are wide enough to support your dish, therefore it’s going to be sturdy and can support the weight of their meals.

Rikki Snyder

Apply a thin coat of glue on the bottom rim of this bowl or mug (the base of this cake rack). Work fast; hot glue dries fast.

Tip: You can take your cake stands apart again later, if you wish. Just place them in the freezer for a half hour to shrink and harden the glue, which makes it effortless to peel off. You might even use craft putty as a temporary, reusable option.

Rikki Snyder

The moment the layer of glue was applied, center on the base the plate or platter that is going to be the cover of the cake rack. Press lightly and maintain it for a few seconds while the glue is setting. Permit the glue to dry for at least a half an hour prior to using or moving your cake rack.

Rikki Snyder

Experiment with platter shapes and heights for variety across your desk.

Tip: The glue should maintain your cake stand together for several celebratory occasions if you take care of the piece correctly. After use, carefully wash the rack with warm water.

Rikki Snyder

Soft, Muted Colors

Trendy color combinations like this muted chopped yellow and grey provide a blank canvas for the treats.

Rikki Snyder

Cupcakes and cake alike will glow on these impromptu cake stands. Combine your favorite colors to make an enticing palette to your dessert table. These colors nicely complement chocolate frosting.

Rikki Snyder

Blues and Whites

You would not use your grandma’s precious china, but put flea market finds to good use by mixing classic cups and plates at a color scheme of your own choice.

Rikki Snyder

A massive plate to the base will provide additional sturdiness in addition to more room for treats. You can experiment with stacking additional tiers without glue; just be certain the plate can support the food things.

Rikki Snyder

If your event comes with a theme, decorate with an intentional color scheme, such as this yellow, white and blue one used for a buffet-style tea station. Utilize your tiered cake rack to display cookies.

Rikki Snyder

Rikki Snyder

Classic White

Using a wide-mouthed bowl since the base for this cake rack creates a simple but sleek look. Use tall glasses paired with curved bowls to display colorful snacks in your next birthday party.

See related

Grove

A grove is a small grouping of trees, yet striking in its appearance due to the absence of undergrowth. A grove could be found naturally in the landscape or planted as an orchard or portion of a designed landscape feature. From the U.K. that a grove is a circular road, similar to a cul-de-sac.

Murphy & Co.. Layout

What makes a grove different from a woods is the absence of undergrowth: scrub, weeds, bushes and saplings.

TRG Architects

A blanket of bark mulch covers this hillside grove.

Landscape d.o.o. Slovenia

An orchard is the greatest grove, where undergrowth is removed to ease access to this fruit.

Designs Northwest Architects, Dan Nelson

This grove sets a dramatic backdrop for the backyard seats and provides a wind barrier to your own flame pit.

David J Frank Landscape Contracting Inc

An ivy ground cover is planted onto a berm with a grove of trees, forming the centerpiece of a circular drive.

Cul-de-sacs or streets, as shown on this map, are known as groves in the uk.

See related

Frame Your Garden

This garden arbor is simple to build and has a beautiful end result — the very best of both worlds for a do-it-yourselfer. The foundation of this arbor is made up of simple structure which can be as simple or as elaborate as wanted, and also the piece may be utilised in many ways outdoors. Use it to showcase a walkway, create a transition from 1 place to another, pay for a bench or gate, or frame a stunning view.

Meg Padgett

Our arbor was both inexpensive and easy to build — to not mention that it’s a beautiful addition to our lawn. It cost less than $150 and took us to construct, such as concrete drying period.

Materials:
(4) 4-by-4 10-foot-long pressure-treated posts(two ) 2-by-6 8-foot-long bamboo planks (1) 2-by-4 8-foot-long bamboo plank (3) 2-by-2 8-foot-long pressure-treated ballusters(two ) Premade wooden ladder trellises(8) 60-pound bags of concreteRustproof deck screwsGravelMeasuring tapeLevelShovelScrap 2-by-4sLadder

Meg Padgett

Plan the Website and the measurements for the arbor. We built a 2-foot-long, 5-foot-wide and 7 1/2-foot-tall arbor at the end of our winding pathway.

Mark the center of the four pole holes. Start with one corner of the arbor and then assess the width and length with that corner. Make sure your holes are perpendicular using either a T-square or a 3-4-5 or 6-8-10 triangle. The diagonals should be the exact same length.

Dig four pole holes based around your marks to a depth of 2 1/2 ft — dig a few more inches deeper to permit dirt — and one foot in diameter. This depth will offer a solid foundation for the arbor.

Meg Padgett

Build a service which will keep the posts standing straight, plumb and square while the concrete sets. We built ours with four 2-by-4s and attached them to one another with deck screws so that they were easily adjustable.

Don’t overlook that the holes have been measured center to center, so when you are building the service make certain to include the added width of the posts. We added 3 inches to every dimension because we used 4-by-4 posts.

Meg Padgett

Next, add about 3 to 4 inches of gravel to every hole. Place the posts in the holes against the corner of every service. Make sure that all posts are the exact same height; remove or add gravel if necessary. Check again that are level, plumb and square.

To maintain the posts plumb, attach two scrap 2-by-4 supports with screws to the bottom of every post, as revealed. Again, check that are level, plumb and square.

Measure the outside dimensions of the article and make sure all the corresponding measurements are equal, such as the diagonals. Adjust as needed. Use one of the 2-by-6 cedar boards to make sure all of the faces are flush to one another by placing it against every pair of posts.

Meg Padgett

After the posts are set, add concrete to the holes. Follow the instructions on your bag of concrete for special mixing recommendations. We mixed ours at a wheelbarrow and added water in small increments. We lasted blending and adding water till it reached the consistency of crumbly cake.

Meg Padgett

Fill each hole with concrete and confirm that everything is level, plumb and square one last moment. Let the concrete dry and fix for the suggested time as listed for your concrete bag.

Meg Padgett

Next, prepare front and side cross-pieces. Cut the boards to a preferred length. Ours were 7 ft long for front and back cross-pieces, and 43 inches long for both side cross-pieces.

Add interest to the arbor by making a layout cut on each end. There are lots of design options to pick from — such as the simple dog-eared style, which could be cut with a circular saw, to a cut like the one , which requires a decoration. Use a template to ensure your cuts are the same. Sand every piece until it is smooth and even.

Meg Padgett

After the concrete has cured for 24 hours, then attach front, side and back cross-pieces, beginning with the sides. Start by attaching one side cross-piece 4 1/2 inches in top of the tallest post — due to settling, the posts may not be the exact same height. The space from the end of the cross-piece to the outside of this post should be equal. This will ensure that it is centered. Check that the cross-piece is level and attach it to the pole using deck screws.

To make sure that both side cross-pieces are level, rest a leading cross-piece on the attached side cross-piece and correct the unattached side piece till it reads level. Mark this place. Place the side cross-piece on the mark and attach it together with deck screws when it’s centered and level.

Note: The cross-pieces look best when they are to scale with one another. We attempted to utilize cedar fencing which we had available for the sides, but the board seemed too thin compared to the 4-by-4 posts and 2-by-6 boards, so we swapped the fencing out for 2-by-4 cedar, that gave the arbor a cohesive look.

Meg Padgett

Next, attach the front and back cross-pieces by resting each on the side cross-pieces. Make sure that both are based and level and that they extend over every article. We used rustproof deck screws to attach the front and back cross-pieces. Typically, lag screws have been used.

Meg Padgett

Together with the cross-pieces set up, cut the 2-by-2s to your preferred length. We made two top rails with 45-degree angles on each end out of one 8-foot-long balluster. To do so, mark the balluster at 47 1/4 inches and then cut away from that mark at a 45-degree angle. Cut each end’s angle to reflect the very first cut, making sure to cut on from the end to maintain the span intact.

Use a miter box and a hand saw or miter saw to cut the angles, unless you are adept at cutting edge angles together with the circular saw.

Twist the best railings perpendicularly to the top of the front and back cross-pieces with deck screws. For an open texture, place the top rails farther apart, and for a cozier feel, place them closer together. We mounted six 47 1/4-inch-long top railings 1 foot from each end and one foot away from one another on center.

Meg Padgett

Feeling inspired? You may try your hand at building your own trellis. Then attach a premade trellis to every side of this arbor with galvanized nails.

Meg Padgett

While the building of this arbor is finished, the overall finish remains open to personal preference.

Consider staining or painting the arbor to match your home or other garden decor items, or leave it as is for a more natural and weathered look as time passes. We stained ours together with Behr’s Premium Weatherproofing Semi-Transparent Stain at Cordovan Brown to match our deck.

Meg Padgett

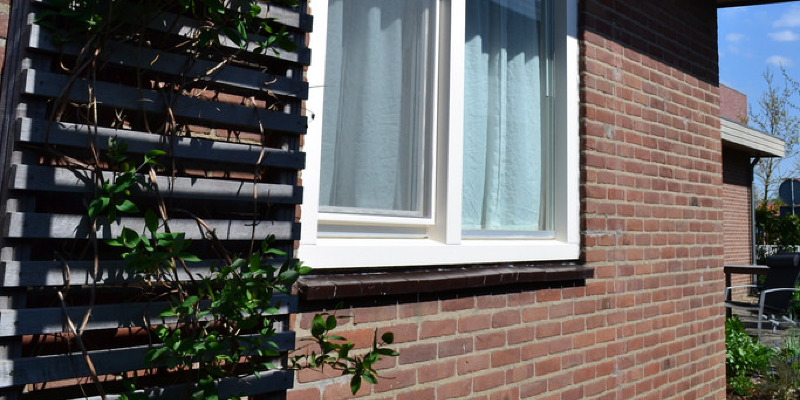
To utilize the arbor’s trellised sides, then put in a climbing plant like this climbing hydrangea.

Don’t be discouraged if your plant is not climbing as fast as you would like. Newly planted climbing hydrangea vines are slow to grow and blossom but make up for this when they attain maturity with beautiful green leaves and aromatic, lacy blooms.

Meg Padgett

Add evergreen hanging plants, like this creeping myrtle, for a yearlong increase of color. Complete the look off with a stainless-steel outside lantern to illuminate the arbor at nighttime.

See related

Contractor Tips: 5 Easy Ways to Get a Greener Home

If you hear the term “green building,” you may first think of solar panels onto the roof or compact fluorescent (CFL) bulbs. Then you may begin to think of bigger concepts, like walls constructed with straw bales. However, while CFLs certainly have their place in every home, and straw bale walls are fantastic for insulation in certain programs, solar power is one of the last things you should consider.

First, you need to shrink your home’s energy use as much as you can, manage your lighting and heat gain and loss, make sure you have good air quality and also assess to make sure that you have well-maintained surfaces inside and outside. Then crown your green masterpiece using a photovoltaic array. It’s important to prioritize your wants and needs during a green remodel, as with every other project. Below are five places to get started.

HighCraft Builders

1. Buy a bath fan. What is the most significant thing in a bathroom? It’s hard to argue with a bathroom and some water. But after those (and before you include a shower), then you require a bath fan. I am amazed at how many baths I move in that don’t have you. A window is not sufficient, and a small noisy fan that no one wishes to turn on is not going to do you any good.

Buy an excellent, silent bath fan, and if it does not have an occupancy sensor, cable it with another timer switch. A fan should operate for at least 10 minutes after you leave the space for odors and 20 to 30 minutes after a shower. Make certain it vents to the outside. Though it’s important to get a specific degree of moisture in the atmosphere in your home, it is bad to have it all in one area. Vent your bathroom and your paint will last longer, you won’t encounter the danger of mold growth and cleaning will be easier.

West Architecture Studio

2. Handle the light. Handling the light that enters your home is a way to save on utility bills and make your home a more cheerful location. Strategically placed awnings and roof overhangs can help you do so. In the summertime, if you don’t want as much light or heat, sunlight is higher in the sky. Because the light strikes your house in a steeper angle, the exact same awning that blocks out light in summer time will allow the low-angled winter mild in if you need it most.

The awning pictured here serves another purpose. Because it’s set down below the top of the window, so it reveals light upward on the ceiling inside, making a nice ambient glow inside instead of a glare.

Buckminster Green LLC

Another fantastic way to get light in your home without earning a lot of unwanted heat is to install a solar lighting tube. These capture the low-angled winter using reflective coatings within a roof-top dome, and are much easier to set up than a skylight since they require no structural headers. Also don’t feel limited to rooms right beneath the roof. The reflective tubes could be run down in the second floor to the first floor although closets or thick walls, and they are even able to make minor turns.

Hilti Spray Foam Gun

3. Insulate. If you spent a lot of money getting the most efficient windows you could afford, don’t let the heat escape all around their sides.

If you have ever used a can of foam, however, you are aware that it can be a tricky, messy process, and some is inevitably wasted if the could dries up. Therefore, in case you have a lot of foaming to perform, put money into a foam gun. The foam does not dry out, and you can control the flow rate, so the application process won’t be as messy and less wasteful.

Geocel 84101 Quick Shield White Sealant – $5.19

As soon as you seal up your house using foam and caulk, you don’t want to trap harmful pollutants inside. Indoor air is generally much worse for you than outside air, and thus don’t make it worse by using home improvement products that release volatile organic compounds (VOCs) into the atmosphere.

Many of you have probably heard of no-VOC paints. However, what about the painter’s caulk? I’ve tried many “green” caulks, and many are not as easy to use as standard painter’s caulk. This product from Geocel is solvent free and VOC free, and it works amazing.

Garrison Hullinger Interior Design Inc..

4. Use reclaimed materials. Most metropolitan regions now have several architectural salvage shops. While materials manufactured from recycled materials are great, remember that it’s decrease, reuse and then recycle.

Reclaimed materials are a great way to reuse. Proceed to the local salvage yard and think creatively. Here a wall is dressed up with old planks, some with the original paint on them. Reclaimed doors, light fixtures and tile are all fantastic ways to give a room character. Don’t be afraid to use something for a purpose other than that which it was intended for; my coffee table in your home is made of an old outside shutter.

Nansulate LDX Clear Lead Encapsulation Coating for Lead Abatement – $84.95

I know what you are thinking: “Kenny, you just got done telling me to not let my airtight home be full of VOCs, and now you are telling me to bring crusty old construction products into my house and leave the old lead paint onto them for allure?”

Yes, however there’s one more step. If you would like to safely coexist with surfaces that may be covered in lead paint (and some other painted surface out of before 1978 should be considered a hazard), you are able to encapsulate the lead by using a product similar to this one from Nansulate. It has quite a low amount of sheen, so that you won’t even know it is there. And you can get that rustic appearance without endangering your family.

Hugh Jefferson Randolph Architects

5. Pick quality materials. Eventually, think about every part of your project with that first “r” — decrease — in mind. We are currently renovating a house in Philadelphia constructed in the 1700s. The floors are first; the plaster is first; the brick front is first. By using materials that last, such as brick, we decrease the number of times a home needs to be renovated. So less waste and less energy used making new materials (and less work for contractors such as me). Of course, there will always be work construction for an increasing people and serving people’s changing needs and preferences. I just hate tearing out a cheap flooring that lasted just ten decades.

More guides to green construction

See related

Charming, Bright Country Home in France

It was the barn which sealed the deal for Alon and Betsy Kasha. When the Parisian couple was searching for a family retreat in Normandy, France, they fell in love with a home that was a part of an old village rectory — the gardener’s home along with the attached barn. They were attracted to its high ceilings and exposed rafters, even though the barn was in shape. Since the owners of a + b kasha layouts, they had plenty of experience renovating turnkey apartments in Paris and could not wait to try their hands at a state home of their own.

at a Glance
Who lives here: Alon and Betsy Kasha
Location: Eure Valley at Normandy, France
Size: 2,500 square feet
That’s interesting: When the Kashas first purchased this home, the barn had its original dirt floors and sand walls.

A+B KASHA Designs

The majority of the exterior of the home has been maintained in its original fashion, with the gardener’s house and the barn connected. The barn now holds 2 bathrooms, three bedrooms and a family room.

A+B KASHA Designs

The room is located on the ground floor of what was formerly the gardener’s residence. Two antique Le Corbusier leather chairs plus a 1930s leather and metallic club chair make a casual seating arrangement around a zinc-topped java table. A French artist created the floor lamp using materials.

A+B KASHA Designs

The ceiling beams in the gardener’s house and the barn are some of the Kashas’ preferred features. Though some original details were preserved, the couple changed both structures’ layouts to reflect a contemporary way of life. They removed several walls to open up and join the kitchen, dining and living room into one great room.

Lighting fixture: made of silicon chip boards with a French designer

A+B KASHA Designs

The family needed a sensible and organized kitchen which would reflect their casual way of life. Simple white lacquered cabinetry is easy to wipe clean, and a butcher block countertop adds a rustic counterpoint. Open dishes and shelving homes serveware, and chimney stores food.

Dining chairs: 1960s Italian leather and chrome; table: Mario Bellini for Cassina

A+B KASHA Designs

The couple chose their light palette for the walls and cut out of Farrow & Ball. The distinct white colors draw attention to the house’s clean lines and play the pure light that floods your south-facing home.

Wall paint: Wimborne White, Skimming Stone and Elephant’s Breath, Farrow & Ball

A+B KASHA Designs

The family used lots of existing furniture out of their previous home, but in different rooms and unique ways. A walnut commode, used for food storage within their old kitchen, now holds puzzles and games in the living space.

Desk: habit; sofa: Habitat

A+B KASHA Designs

The all-white walls create a relaxing and serene atmosphere, much like the surrounding village. There are not lots of windows at the upstairs portions of the home, however, the white hallways pull the light from one side of the home to the other.

A+B KASHA Designs

A guest bedroom on the ground floor of the barn appears onto one of the house’s many gardens. Embroidered bedding out of Paris mimics the engravings on a classic light fixture.

A+B KASHA Designs

Alon and Betsy chose their master bedroom based on its unique architectural details. “Its pitched ceiling with lovely old beams creates a relaxing and tranquil area,” Betsy says. The table holding a portion of their book set is a classic Chinese daybed. The couple cut the legs down and used it as a coffee table in their very first house.

A daybed in a different bedroom takes advantage of a cozy nook created by the house’s sloping rafters. Youthful pillows contrast with a more traditional rug — a great example of the couple’s signature fashion.

Bedding and cushions: Le Bon Marche; light: Ikea; daybed: Habitat

A+B KASHA Designs

This bedroom is one of the only rooms in the home with a nonneutral color.

Wall paint: Borrowed Light, Farrow & Ball; carpeting: Saint Maclou; bedding: Caravane

A+B KASHA Designs

The home’s gardens and yard were a massive draw for the Kashas. Although much of the property was wild and overgrown when they first purchased it, they tamed it into a large outdoor area they can enjoy almost year-round.

See related

The Great Paper Push: Just Say No

I love mail. As a child, I could spot an invite and differentiate junk mail from a mile off. I’d gotten it in my mind that those who obtained mail were individuals of importance (that is, adults). Now that I’m firmly in my mature years, not much has changed. It’s a daily habit to check for mail when I pass the box (even when I know that shipping isn’t until late afternoon). And though I romanticize the correspondence component of mail, bills get exactly the same treatment. Staying at the top of finances and invoices is my nod to be responsible, one of these adult traits I so admired as a kid.

Going paperless is something I have wrestled with for a couple of decades now, but the efficient part of me has finally succeeded. I know that no matter how organized I am with my paper, it is just faster to reside a paperless life. Less time opening mail and keeping track of this before it gets registered means longer time to do anything.

You’d be stunned at how many ways there are to go awry. Some measures are effortless, though others might take a little more time and expertise. Let’s dig in and see how you can begin your journey immediately.

Murphy & Co.. Design

1. Simply say, “No thanks.” On a daily basis, I am offered extra paper and politely decline. Some prime examples: coupons from office supply shops, random flyers and business cards. And in the workplace, your colleagues are probably at the regular of handing over paperwork and agendas. To counteract this:
• First, recognize when you really don’t need the paper and decline it.
• If it is imperative that you’ve got the info, ask the information in email form.
• Take benefit when a shop offers to email you the receipt.
• Next time you find yourself waiting in the physician’s office, car wash or DMV, empty your pocket or handbag. This five-minute action will keep paper piles from building in your home.

Ed Ritger Photography

2. Cease printing stuff. I discover that if people print things, it is because they don’t trust their own systems. Perfect example: A significant email ends up in your inbox and rather than correctly archiving it, you print it. After we’re not comfortable using our digital tools, we go out of our way to feel safe. To combat this printing instinct:
• Read online tutorials and ask friends who know how to process email how they perform it.
• Sign up for a free workshop in an Apple retail store.
• Unsubscribe from undesirable newsletters and emails. Whenever there’s less virtual clutter, you’ll realize that you can locate files easier and will not have to print them just so that you know where they’re.
• Create your email system do the job for you by creating tags and filters so that you spend less time sorting through the incoming mail.
• Use your browser’s bookmark feature to catalogue pictures, recipes and much more.
• Try this tip for creating email files: Your digital files should mirror your paper files.

Kristen Rivoli Interior Design

3. Stop junk mail. I live by the phrase “Junk mail should never touch a surface.”

• Recycle junk odds and ends prior to going into the home. If junk mail finds its way inside, it is best to eliminate it immediately.
• If your program doesn’t permit for daily processing or if you feel like your mail piles triple immediately, use Catalog Option and MailStop. Catalog Option is a lot like hitting an unsubscribe button: simply go to the website and select out of receiving certain catalogs. MailStop is under the Catalog Choice umbrella. It includes three add-on services that vary from a free cell phone app to some $20 yearly support.

Tell us Are you currently doing anything from this list of paperless practices? Is there anything that you implement at home that I left out?

More:
Paperless Home Offices Show Reams of Style

See related